Advanced - Team Activities App
Ready to take things further? This advanced tutorial will take you step-by-step through building a Showpad App that enables people in your organization to create teams, join them, and propose activities.
The finished app will incorporate:
| Quantity | Description | |
|---|---|---|
| AppsDB Stores | 2 | These shared stores will hold:
|
| Extension Types | 3 | These will be rendered on various extension points on the Showpad platform:
|
While building this app, you’ll work with:
| Description | |
|---|---|
| Experience App SDK | This will enable you to leverage the capabilities of the Showpad platform. |
| Extension Types | These will interact with each other through AppsDB. |
| Showpad CLI | This provides the ability to bundle and upload the app. |
You'll find the Team Activities app's code with all the files in this GitHub repository. Feel free to clone this repository and use it as a reference or compare it to the final version of the app you create.
No frameworks or UI kits are needed for this tutorial. The examples here use vanilla TypeScript to keep the app as light as possible. To scaffold, run, and build the app, we'll use Vite (you can use the tooling of your choice to achieve these tasks).
Development
- HTML & JavaScript knowledge
- A Code Editor (we recommend Visual Studio Code)
- Node.js 15+
- Git
Showpad
- Plan: Ultimate | Advanced or Expert
- Permissions: Administrator access to Showpad's Admin App
1. Initialize App
Create App Folder
The first step is to use Vite to scaffold, run and build the app. This command will create the app folder and all of the necessary files:
npm create vite@latest team-activities-app
The process creates a file and two folders that aren't necessary at this point, so you should delete:
index.htmlfilesrcfolderpublicfolder
It also creates the tsconfig.json file. You need to update the include property in this file to ensure that all of
the Typescript files are compiled:
{
  ...
  "include": ["**/*.ts"]
}
Install NodeJS Dependencies
Next, it's time to install the NodeJS dependencies (Typescript and Vite).
In the team-activities-app folder, run the install command:
npm install
Install Experience App SDK
During development of your Showpad App, you'll use the Experience App SDK to interact with the Showpad API.
In the team-activities-app folder, run the the following command:
npm install @showpad/experience-app-sdk
Install Showpad CLI
The Showpad CLI is Showpad's robust command-line tool that helps streamline the development of Showpad Apps.
In the team-activities-app folder, run the the following command:
npm install -D @showpad/cli
Install Dependencies
You'll also need a library to generate the UUIDs of the records stored in the AppsDB.
In the team-activities-app folder, run the the following command:
npm i -D @types/uuid
Login to Showpad
In order to connect to your Showpad environment, you must run the login
command and follow the prompt:
npx showpad login
Create Manifest
The Manifest defines your app's:
- schema and version
- public information
- extension(s)
In your app's root folder, create a manifest.json file:
{
    "$schema": "https://schema.showpad.com/app/manifest.v2.json",
    "schema": {
        "type": "app-manifest",
        "version": 2
    },
    "appKey": "<your-app-key>",
    "name": "Team Activities App",
    "version": "0.0.1",
    "description": {
        "short": "The Team Activities App",
        "full": "An App to propose some team activities for your next team events"
    },
    "developer": {
        "name": "<your-developer-name>",
        "websiteUrl": "<your-website-url>"
    }
}
Declare AppsDB stores
In order to store data in AppsDB, you must declare your stores and perform an initial upload of your app.
-
Add the following lines to your
manifest.jsonfile:{
...
"sharedStores": [
{ "id": "teams-store" },
{ "id": "team-activities-store" }
]
}
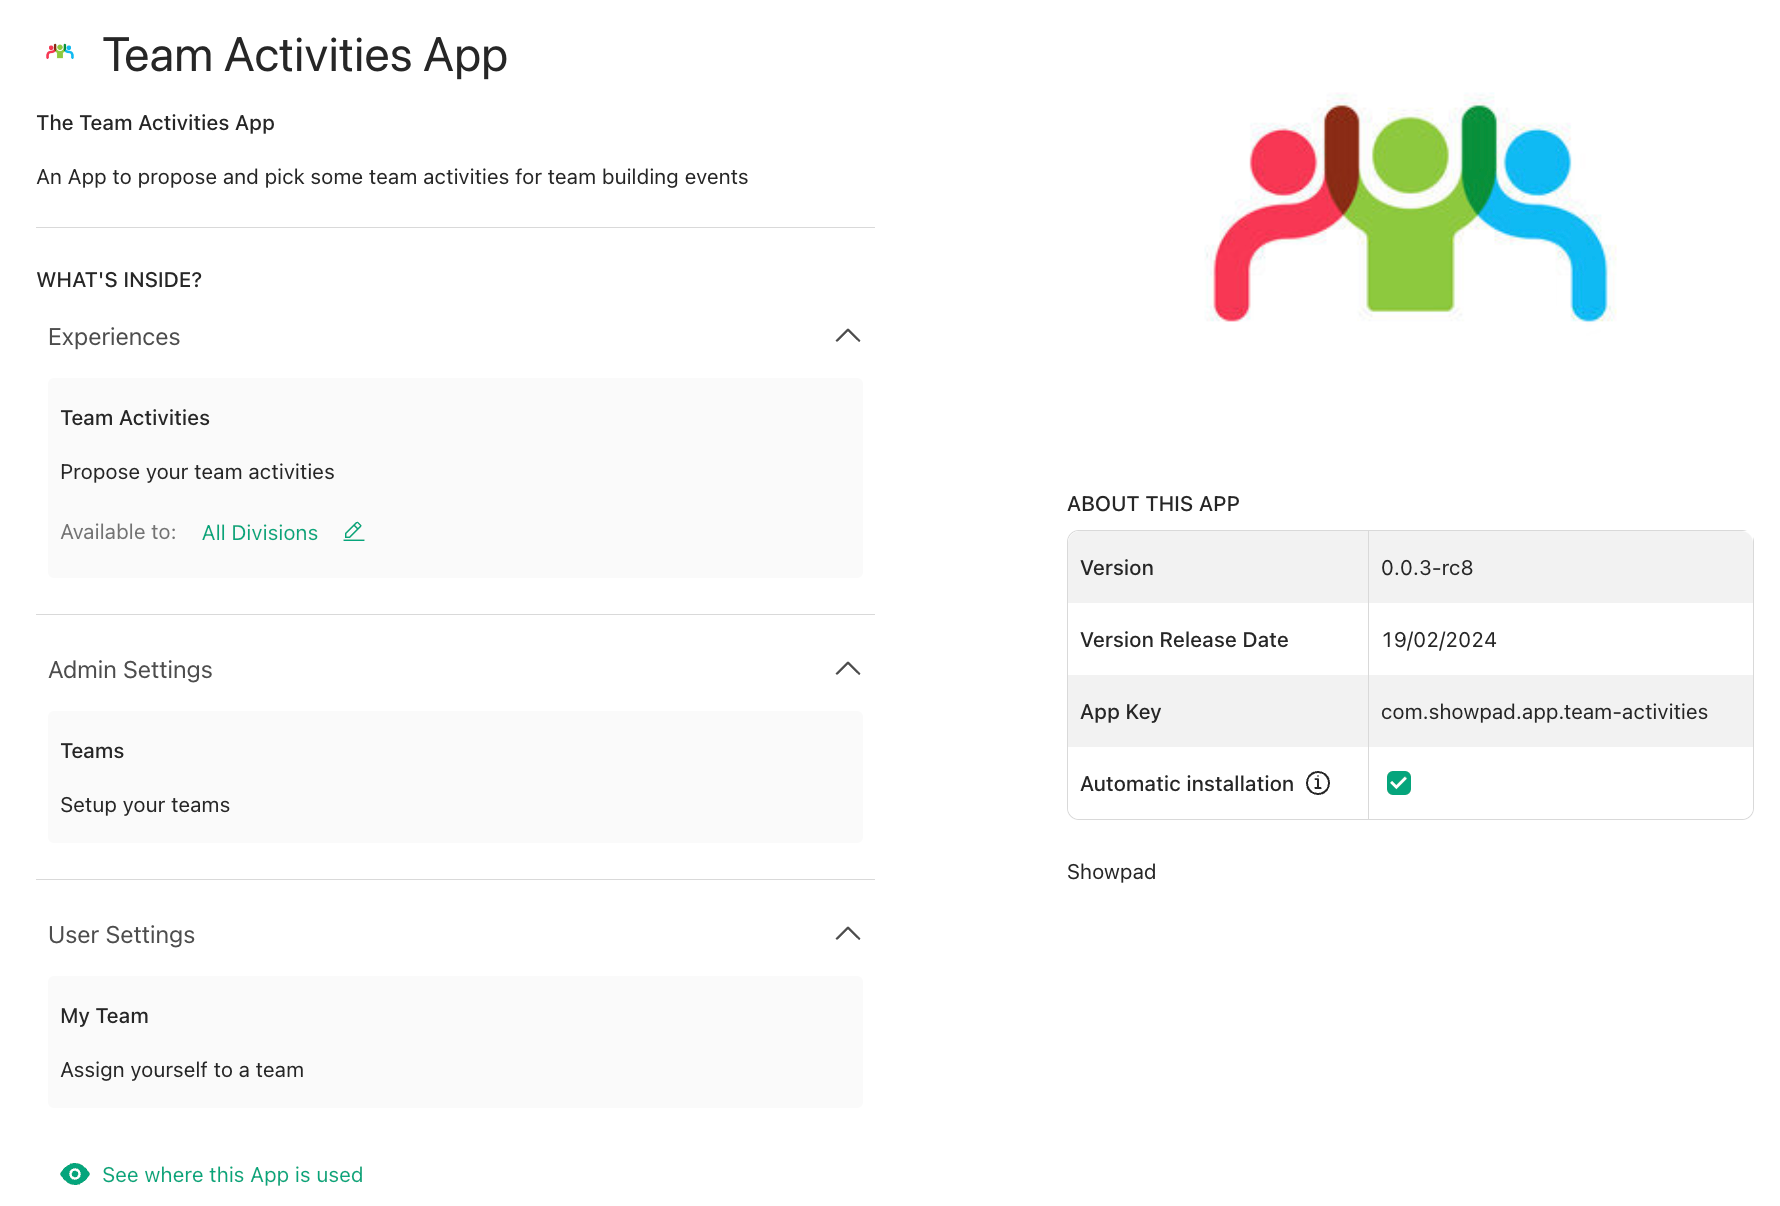
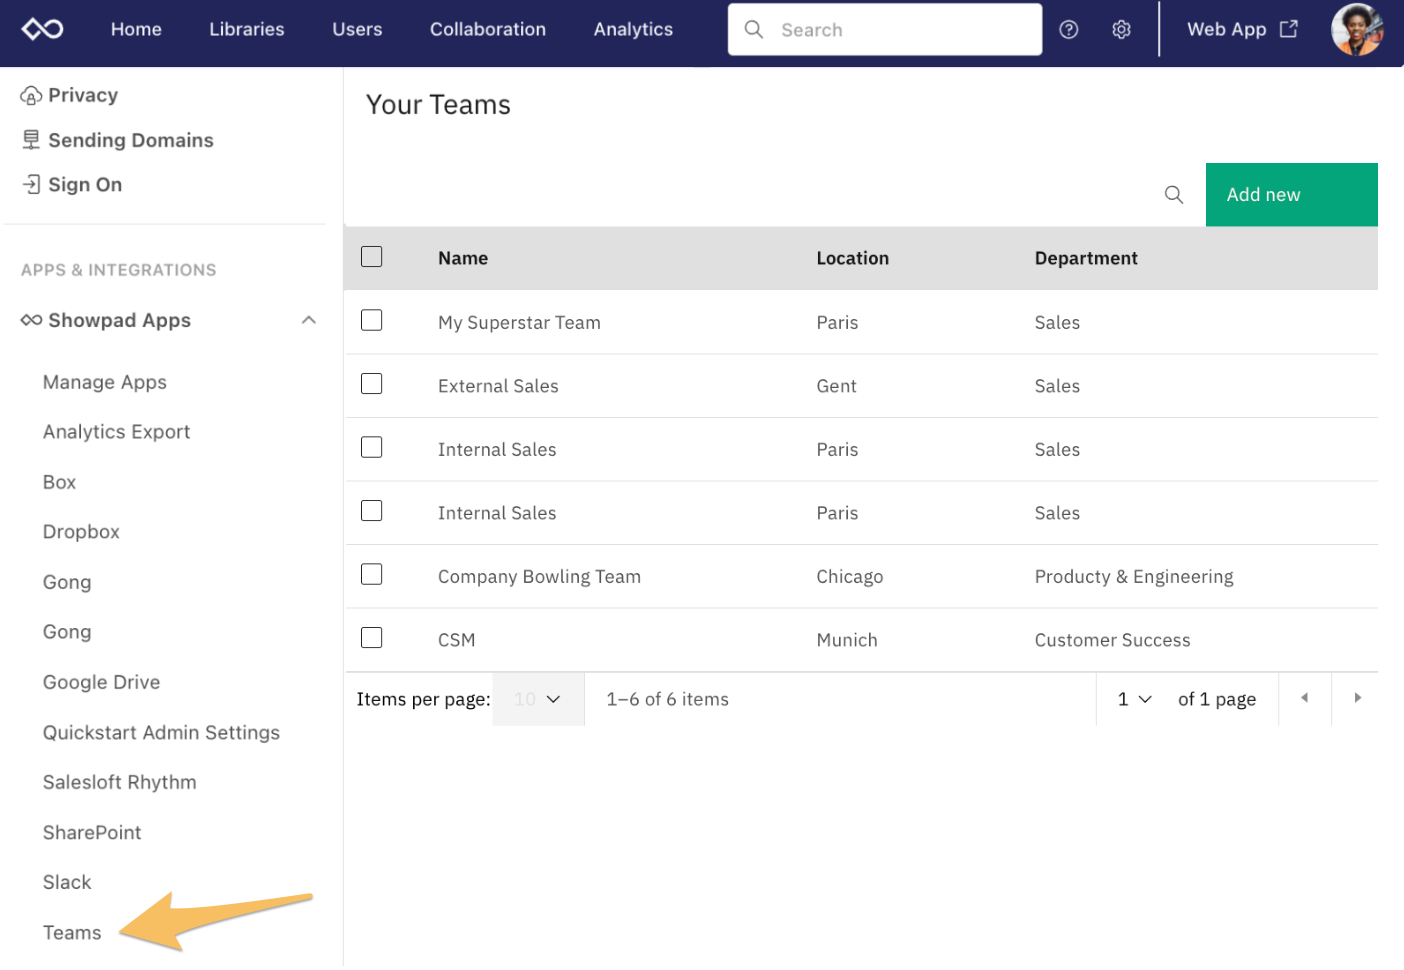
2. Admin Settings Extension
The Admin Settings extension enables admins to create teams in their organizsations.

Declare Extension
The Admin Settings extension will add a new entry within the Showpad Apps section of the Admin Settings menu on the Admin App.
To define an Admin Settings extension for your app, add the following lines to the manifest.json file:
{
    ...
    "adminSettings": [
        {
            "extensionKey": "team-activities-admin-settings",
            "name": "Teams",
            "description": "Setup your teams",
            "resources": {
                "folder": "admin-settings"
            }
        }
    ]
}
Create Extension Folder
Run the following command to create a folder for your Admin Settings extension:
mkdir admin-settings
Within this folder, add this vite.config.ts file:
admin-settings/vite.config.ts
import { defineConfig } from 'vite';

export default defineConfig({
  base: './',
  build: {
    target: 'ES2022',
    outDir: '../dist/admin-settings',
  },
});
This file:
- defines the EcmaScript version used to build the extension
- specifies that built files are generated into the
../dist/admin-settingsfolder
Create Index
The index.html is the entry point of your extension. For this extension, this file defines a form to create a team and
a table to list existing teams.
Create the following file in your Admin Settings folder:
admin-settings/index.html
<!DOCTYPE html>
<html lang="en">
  <head>
    <meta charset="UTF-8" />
    <meta name="viewport" content="width=device-width, initial-scale=1.0" />
    <link rel="stylesheet" href="./src/style.css" />
    <title>Team Activities App - Admin Settings</title>
  </head>
  <body>
    <div class="app-wrapper">
      <div class="section-title">Add a Team</div>
      <form>
        <input type="text" id="name" name="name" placeholder="Team Name" />
        <button type="button" id="addTeamButton">Add a Team</button>
      </form>

      <div class="section-title">All Teams</div>
      <div id="teamList"></div>
    </div>

    <script type="module" src="./src/main.ts"></script>
  </body>
</html>
Create Script
The code for your extension resides in the src/main.ts file. For this extension, this file defines the functions to
create a new team and render the team list.
Create the following file in your Admin Settings folder:
admin-settings/src/main.ts
import { Showpad } from '@showpad/experience-app-sdk';
import { AxiosInstance } from 'axios';
import { v4 as uuid } from 'uuid';

type Team = {
    name: string;
};

const TEAMS_STORE_ID = 'teams-store';

let showpadInstance: AxiosInstance;

const addTeam = async () => {
    try {
        const nameField = document.querySelector<HTMLInputElement>('#name')!;
        const team: Team = {
            name: nameField.value || '',
        };

        if (team.name) {
            await Showpad.setGlobalStoreEntryValue(TEAMS_STORE_ID, uuid(), team, showpadInstance);
            nameField.value = '';

            renderTeamList();

            Showpad.displayToast({
                type: 'success',
                text: 'Team created',
            });
        }
    } catch (error) {
        Showpad.handleErrorWithToast(error);
        console.error(error);
    }
};

const renderTeamList = async () => {
    try {
        const teams = await Showpad.getGlobalStoreEntries<Team>(TEAMS_STORE_ID);
        let teamListHtml = '';
        teams.forEach((team) => (teamListHtml += `<tr><td>${team.value.name}</td></tr>`));
        document.querySelector<HTMLDivElement>('#teamList')!.innerHTML = `<table><th>Team Name</th>${teamListHtml}</table>`;
    } catch (error) {
        Showpad.handleErrorWithToast(error);
        console.error(error);
    }
};

const main = async (): Promise<void> => {
    try {
        await Showpad.onShowpadLibLoaded();
        showpadInstance = await Showpad.getShowpadInstance('v3');

        // Render team list
        renderTeamList();

        // Bind CTAs
        const btn = document.querySelector<HTMLButtonElement>('#addTeamButton');
        btn?.addEventListener('click', () => addTeam());
    } catch (error) {
        Showpad.handleErrorWithToast(error);
        console.error(error);
    }
};

main();
In order to test your extension locally, you must complete this tutorial since an initial version of the app needs to be uploaded and installed in your Showpad instance.
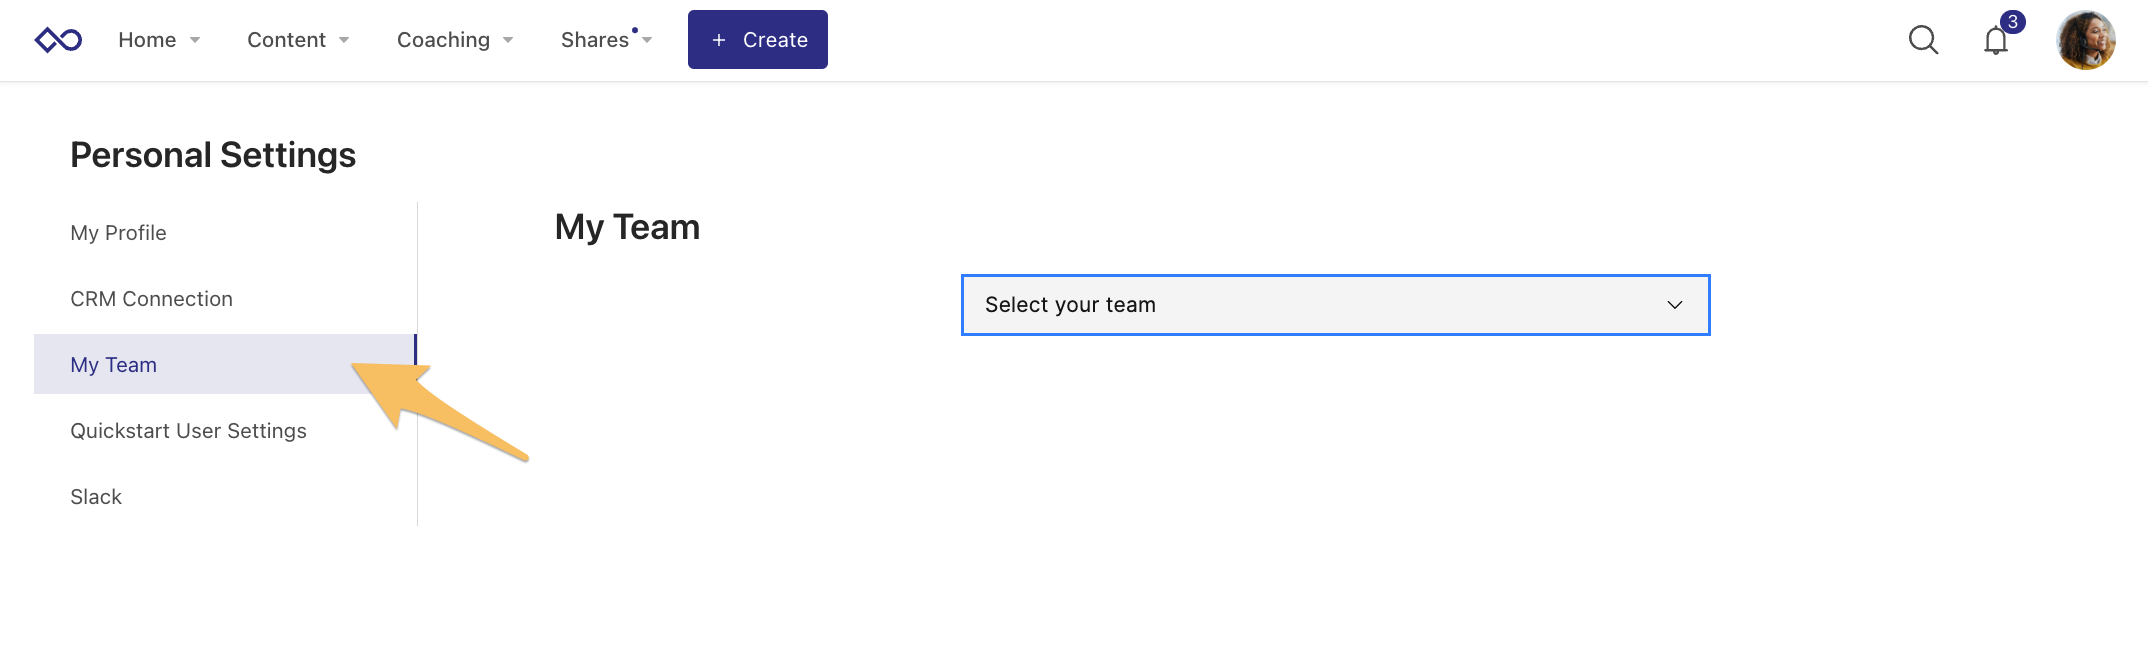
3. User Settings Extension
The User Settings extension enables users to join teams.
Declare Extension
The User Settings extension will add a new entry within the user's Settings menu in the Showpad Web App.
To define the User Settings extension for your app, add these lines to the manifest.json file:
{
    ...
    "userSettings": [
        {
            "extensionKey": "team-activities-user-settings",
            "name": "My Team",
            "description": "Assign yourself to a team",
            "resources": {
                "folder": "user-settings"
            }
        }
    ]
}
Create Extension Folder
Run the following code to create a folder for your User Settings extension:
mkdir user-settings
Within this folder, add this vite.config.ts file:
user-settings/vite.config.ts
import { defineConfig } from 'vite';

export default defineConfig({
  base: './',
  build: {
    target: 'ES2022',
    outDir: '../dist/user-settings',
  },
});
This file:
- defines the EcmaScript version used to build the extension
- specifies that built files are generated into the
../dist/admin-settingsfolder
Create Index
The index.html is the entry point of your extension. For this extension, this file defines a form for users to select
a team.
Create the following file in your User Settings folder:
user-settings/index.html
<!DOCTYPE html>
<html lang="en">
  <head>
    <meta charset="UTF-8" />
    <meta name="viewport" content="width=device-width, initial-scale=1.0" />
    <link rel="stylesheet" href="./src/style.css" />
    <title>Team Activities App - User Settings</title>
  </head>
  <body>
    <div class="app-wrapper">
      <form>
        <div class="section-title">Select your team</div>
        <select id="myTeam" name="myTeam"></select>
      </form>
    </div>

    <script type="module" src="./src/main.ts"></script>
  </body>
</html>
Create Script
The code of the extension resides in the src/main.ts file. For this extension, this file defines the functions to
store the selected team.
Create the following file in your User Settings folder:
user-settings/src/main.ts
import { Showpad } from '@showpad/experience-app-sdk';

type Team = Showpad.Scalar & {
    name: string;
    location: string;
    department: string;
};

const TEAMS_STORE_ID = 'teams-store';
const MY_TEAM_ENTRY_ID = 'myTeamId';

const myTeamDropdownElement = document.querySelector<HTMLSelectElement>('#myTeam')!;

const populateTeamDropdown = async (): Promise<void> => {
    let optionsHtml = '<option>Select your team</option>';
    const myTeamId = await Showpad.getStoreEntryValue<Team>(TEAMS_STORE_ID, MY_TEAM_ENTRY_ID);
    const teams = await Showpad.getGlobalStoreEntries<Team>(TEAMS_STORE_ID);
    teams.forEach(
        (team) => (optionsHtml += `<option value="${team.id}" ${myTeamId === team.id ? 'selected' : ''}>${team.value.name}</option>`),
    );
    myTeamDropdownElement.innerHTML = optionsHtml;
};

const setMyTeam = async (): Promise<void> => {
    try {
        await Showpad.setStoreEntryValue(TEAMS_STORE_ID, MY_TEAM_ENTRY_ID, myTeamDropdownElement.value);
        Showpad.displayToast({
            type: 'success',
            text: 'Your team has been set',
        });
    } catch (error) {
        Showpad.handleErrorWithToast(error);
        console.error(error);
    }
};

const main = async (): Promise<void> => {
    try {
        await Showpad.onShowpadLibLoaded();

        // Populate the team dropdown
        populateTeamDropdown();

        // Bind CTAs
        myTeamDropdownElement.addEventListener('change', () => setMyTeam());
    } catch (error) {
        Showpad.handleErrorWithToast(error);
        console.error(error);
    }
};

main();
In order to test your extension locally, you must complete this tutorial since an initial version of the app needs to be uploaded and installed in your Showpad instance.
4. Experience Type Extension
The Experience Type extension will enable users to propose activities for the team events.

Declare Extension
The Experience Type extension will add a new type of Experience on the Create New Experiences dialog in the Admin App.
To define the Experience Type extension for your app, add these lines to the manifest.json file:
{
    ...
    "experienceTypes": [
        {
            "extensionKey": "team-activities-experience-type",
            "name": "Team Activities",
            "description": "Propose your team activities",
            "resources": {
                "folder": "experience"
            }
        }
    ]
}
Create Extension Folder
Run the following code to create a folder for your Experience Type extension:
mkdir experience
Within this folder, add a vite.config.ts file:
experience/vite.config.ts
import { defineConfig } from 'vite';

export default defineConfig({
  base: './',
  build: {
    target: 'ES2022',
    outDir: '../dist/experience',
  },
});
This file:
- defines the EcmaScript version used to build the extension
- specifies that built files are generated into the
../dist/admin-settingsfolder
Define Experience Config
The configuration of your Experience Type extension is defined in the config.json file. This file:
- specifies the content shown in your Experiences (e.g., assets, labels, tags, etc.)
- contains properties that can be overwritten by an admin when creating an Experience through the Experience App builder
For this tutorial, we've defined two labels and an asset. When creating an Experience from this extension, the admin will be able to input the labels and pick the logo for the Experience.
You can define the configuration properties in the experience/public/config.json file:
{
    "version": 1,
    "labels": {
        "intro": {
            "part1": "Here you can propose some activities for your next Team event.",
            "part2": "Don't hesitate, go nuts!"
        }
    },
    "contents": {
        "logo": { "type": "asset" }
    }
}
Create Index
The index.html is the entry point of your extension. For this tutorial, we've defined:
- placeholders to render a greeting with information coming from the
config.jsonfile - a form to propose a team activity
- a table to list all proposed activities
Create the following file in your Experience folder:
experience/index.html
<!DOCTYPE html>
<html lang="en">
  <head>
    <meta charset="UTF-8" />
    <meta name="viewport" content="width=device-width, initial-scale=1.0" />
    <link rel="stylesheet" href="./src/style.css" />
    <title>Team Activities App - Experience</title>
  </head>
  <body>
    <div class="app-wrapper">
      <div id="logoWrapper" class="logo-wrapper"></div>

      <div id="userGreetings" class="user-greetings"></div>
      <div id="myTeam" class="my-team"></div>

      <div class="intro-wrapper">
        <div id="introPart1" class="intro"></div>
        <div id="introPart2" class="intro"></div>
      </div>

      <div id="teamActivityCrud">
        <div class="section-title">Propose a Team Activity</div>
        <form>
          <textarea
            type="text"
            id="teamActivityDescription"
            name="description"
            placeholder="Write your team activity proposal here"
          ></textarea>

          <button type="button" id="addTeamActivityButton">Add a Team Activity</button>
          <input type="checkbox" id="teamActivityAnonymous" name="anonymous" />
          <label for="teamActivityAnonymous">Anonymous</label>
        </form>

        <div class="section-title">All Team Activities</div>
        <div id="teamActivityList"></div>
      </div>
    </div>

    <script type="module" src="./src/main.ts"></script>
  </body>
</html>
Create Script
The code of the extension resides in the src/main.ts file. For this extension, this file defines the functions to
render the information coming from the config.json, to create a new team activity and to render the activity list.
Create the following file in your Experience folder:
experience/src/main.ts
import { Showpad } from '@showpad/experience-app-sdk';
import { AxiosInstance } from 'axios';
import { v4 as uuid } from 'uuid';

type TeamActivity = {
    description: string;
    teammate: string;
    teamId: string;
};

type Team = {
    name: string;
};

const TEAM_ACTIVITIES_STORE_ID = 'team-activities-store';
const TEAMS_STORE_ID = 'teams-store';
const MY_TEAM_ENTRY_ID = 'myTeamId';

let showpadInstance: AxiosInstance;
let myTeamId: string;
let myTeam: Team;

const addTeamActivity = async () => {
    try {
        const teamActivity: TeamActivity = {
            description: document.querySelector<HTMLInputElement>('#teamActivityDescription')?.value || '',
            teammate: document.querySelector<HTMLInputElement>('#teamActivityAnonymous')!.checked
                ? ''
                : (await Showpad.getUserInfo()).fullName,
            teamId: myTeamId?.toString(),
        };

        if (teamActivity.description && teamActivity.teamId) {
            await Showpad.setGlobalStoreEntryValue(TEAM_ACTIVITIES_STORE_ID, uuid(), teamActivity, showpadInstance);
        }

        renderTeamActivityList();
    } catch (error) {
        Showpad.handleErrorWithToast(error);
        console.error(error);
    }
};

const renderTeamActivityList = async () => {
    const teamActivities = (await Showpad.getGlobalStoreEntries<TeamActivity>(TEAM_ACTIVITIES_STORE_ID)).filter(
        (teamActivity) => teamActivity.value.teamId === myTeamId,
    );
    let teamActivityListHtml = '';
    teamActivities.forEach(
        (teamActivity) =>
            (teamActivityListHtml += `<tr><td>${teamActivity.value.description}</td><td>${teamActivity.value.teammate}</td></tr>`),
    );
    document.querySelector<HTMLDivElement>('#teamActivityList')!.innerHTML = `
        <table>
            <tr><th>Description</th><th>Teammate</th></tr>
            ${teamActivityListHtml}
        </table>`;
};

const showGreetings = async (): Promise<void> => {
    const userInfo = await Showpad.getUserInfo();
    document.querySelector<HTMLDivElement>('#userGreetings')!.innerHTML = `Hello ${userInfo.fullName}!`;
};

const showLogoAndIntro = async (): Promise<void> => {
    const config = await Showpad.parseEnrichedConfig();
    document.querySelector<HTMLDivElement>('#introPart1')!.innerHTML = config.labels?.intro?.part1?.value;
    document.querySelector<HTMLDivElement>('#introPart2')!.innerHTML = config.labels?.intro?.part2?.value;
    document.querySelector<HTMLDivElement>('#logoWrapper')!.innerHTML = `<img src="${
        config.assets[config.contents?.logo?.value]?.previewUrl
    }"/>`;
};

const initMyTeam = async (): Promise<void> => {
    const myTeamDomElement = document.querySelector<HTMLDivElement>('#myTeam')!;
    myTeamId = await Showpad.getStoreEntryValue(TEAMS_STORE_ID, MY_TEAM_ENTRY_ID);
    if (myTeamId) {
        myTeam = await Showpad.getGlobalStoreEntryValue<Team>(TEAMS_STORE_ID, myTeamId);
        if (myTeam) {
            myTeamDomElement.innerHTML = `Your team is <strong>${myTeam.name}</strong>`;
            document.querySelector<HTMLDivElement>('#teamActivityCrud')!.style.display = 'block';
        } else {
            myTeamDomElement.innerHTML = "Your team doesn't exist anymore";
        }
    } else {
        myTeamDomElement.innerHTML = 'Please select your team in the "My Team" user settings';
    }
};

const main = async (): Promise<void> => {
    try {
        // Wait for the Showpad SDK to be initialized
        await Showpad.onShowpadLibLoaded();
        showpadInstance = await Showpad.getShowpadInstance('v3');

        // Show greetings
        await showGreetings();

        // Show logo and intro
        await showLogoAndIntro();

        // Init
        await initMyTeam();

        if (myTeamId) {
            // Render team activity list
            renderTeamActivityList();

            // Bind event listeners
            document.querySelector<HTMLButtonElement>('#addTeamActivityButton')!.addEventListener('click', () => addTeamActivity());
        }
    } catch (error) {
        Showpad.handleErrorWithToast(error);
        console.error(error);
    }
};

main();
In order to test your extension locally, you must complete this tutorial since an initial version of the app needs to be uploaded and installed in your Showpad instance.
5. Build App
-
Before building your app, you need to replace the build script in the
package.jsonwith this one:{
"scripts": {
...
"build": "tsc && vite build admin-settings && vite build user-settings && vite build experience",
...
}
} -
Then in your app's root folder, run the following command:
npm run buildThis will generate a
distfolder containing the resources of your extensions.
6. Bundle App
-
Add this script to the
package.json:{
"scripts": {
...
"prebundle": "cp manifest.json dist && cp -r images dist",
...
}
} -
Then, run the
prebundlescript:npm run prebundle -
Next, generate a Showpad package of your app by running the following command:
npx showpad apps bundle -s distThis will generate the
<your-app-key>.0.0.1.showpadfile in your app's root folder.
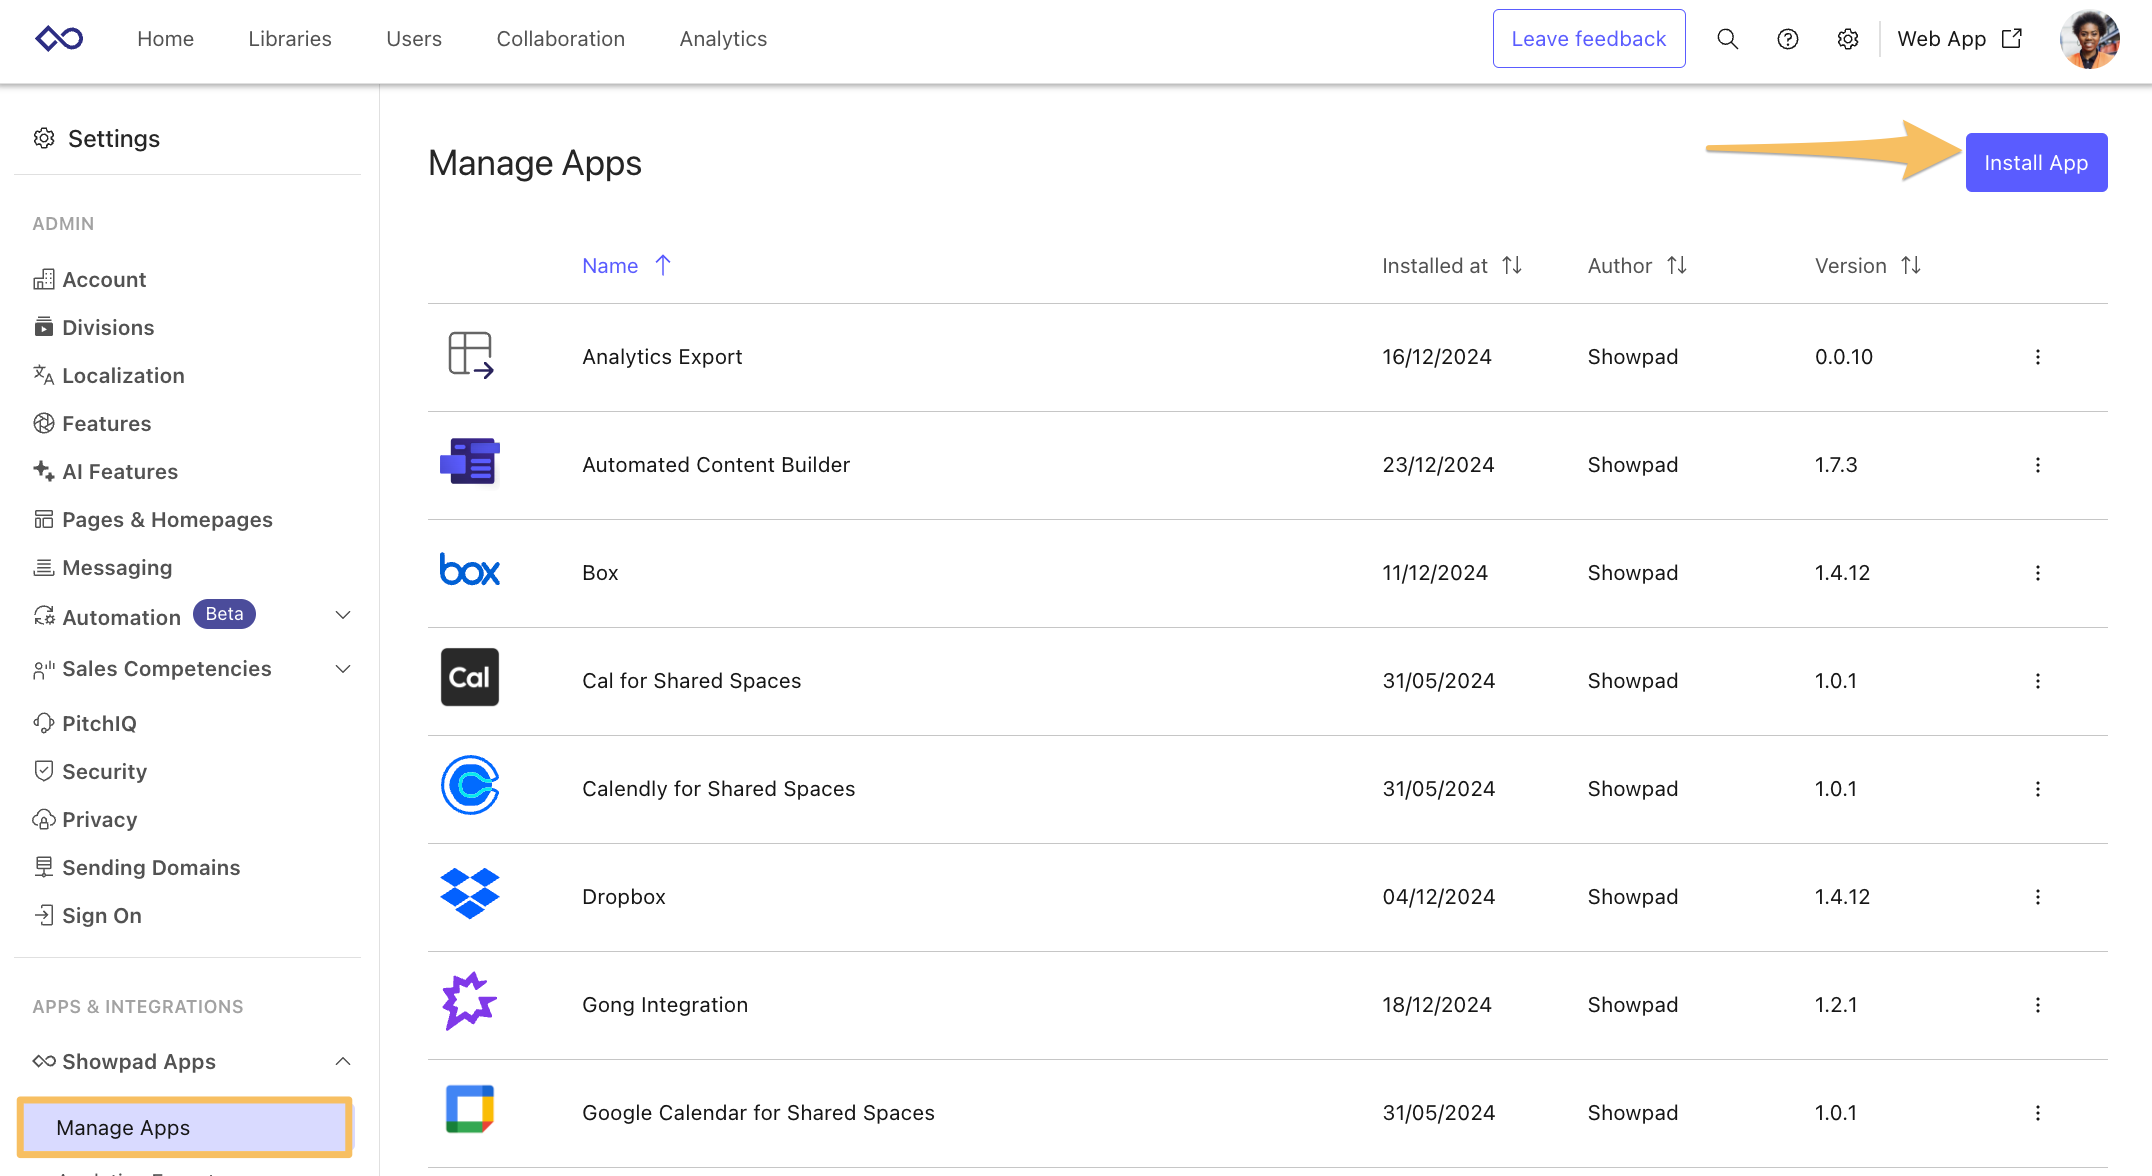
7. Upload to Showpad
In your app's root folder, run the following command:
npx showpad apps upload <your-app-key>.0.0.1.showpad
8. Install App
Now is the moment you've been working for! It's time to install your app through the Admin App.
9. Test App
In Showpad
As soon as your app is installed, you should see the following enhancements in your Showpad instance:
-
A new Teams app in the Showpad Apps section of Admin Settings in the Admin App
-
A new Team Activities option when creating an Experience
-
A new My Team entry in users' Settings on the Showpad Web App
On Local Server
Admin Settings Extension
In your app's root folder, run the following command:
npm run dev admin-settings
You can then:
-
Open Admin Settings in the Admin App
-
Select Admin Settings Test from the Showpad Apps section
-
Click the
</>button:
-
Input the URL of your local server to render it within the Showpad platform:

User Settings Extension
In your app's root folder, run the following command:
npm run dev user-settings
You can then:
-
Open Settings in the Web App
-
Select User Settings Test in the left menu
-
Click the
</>button:
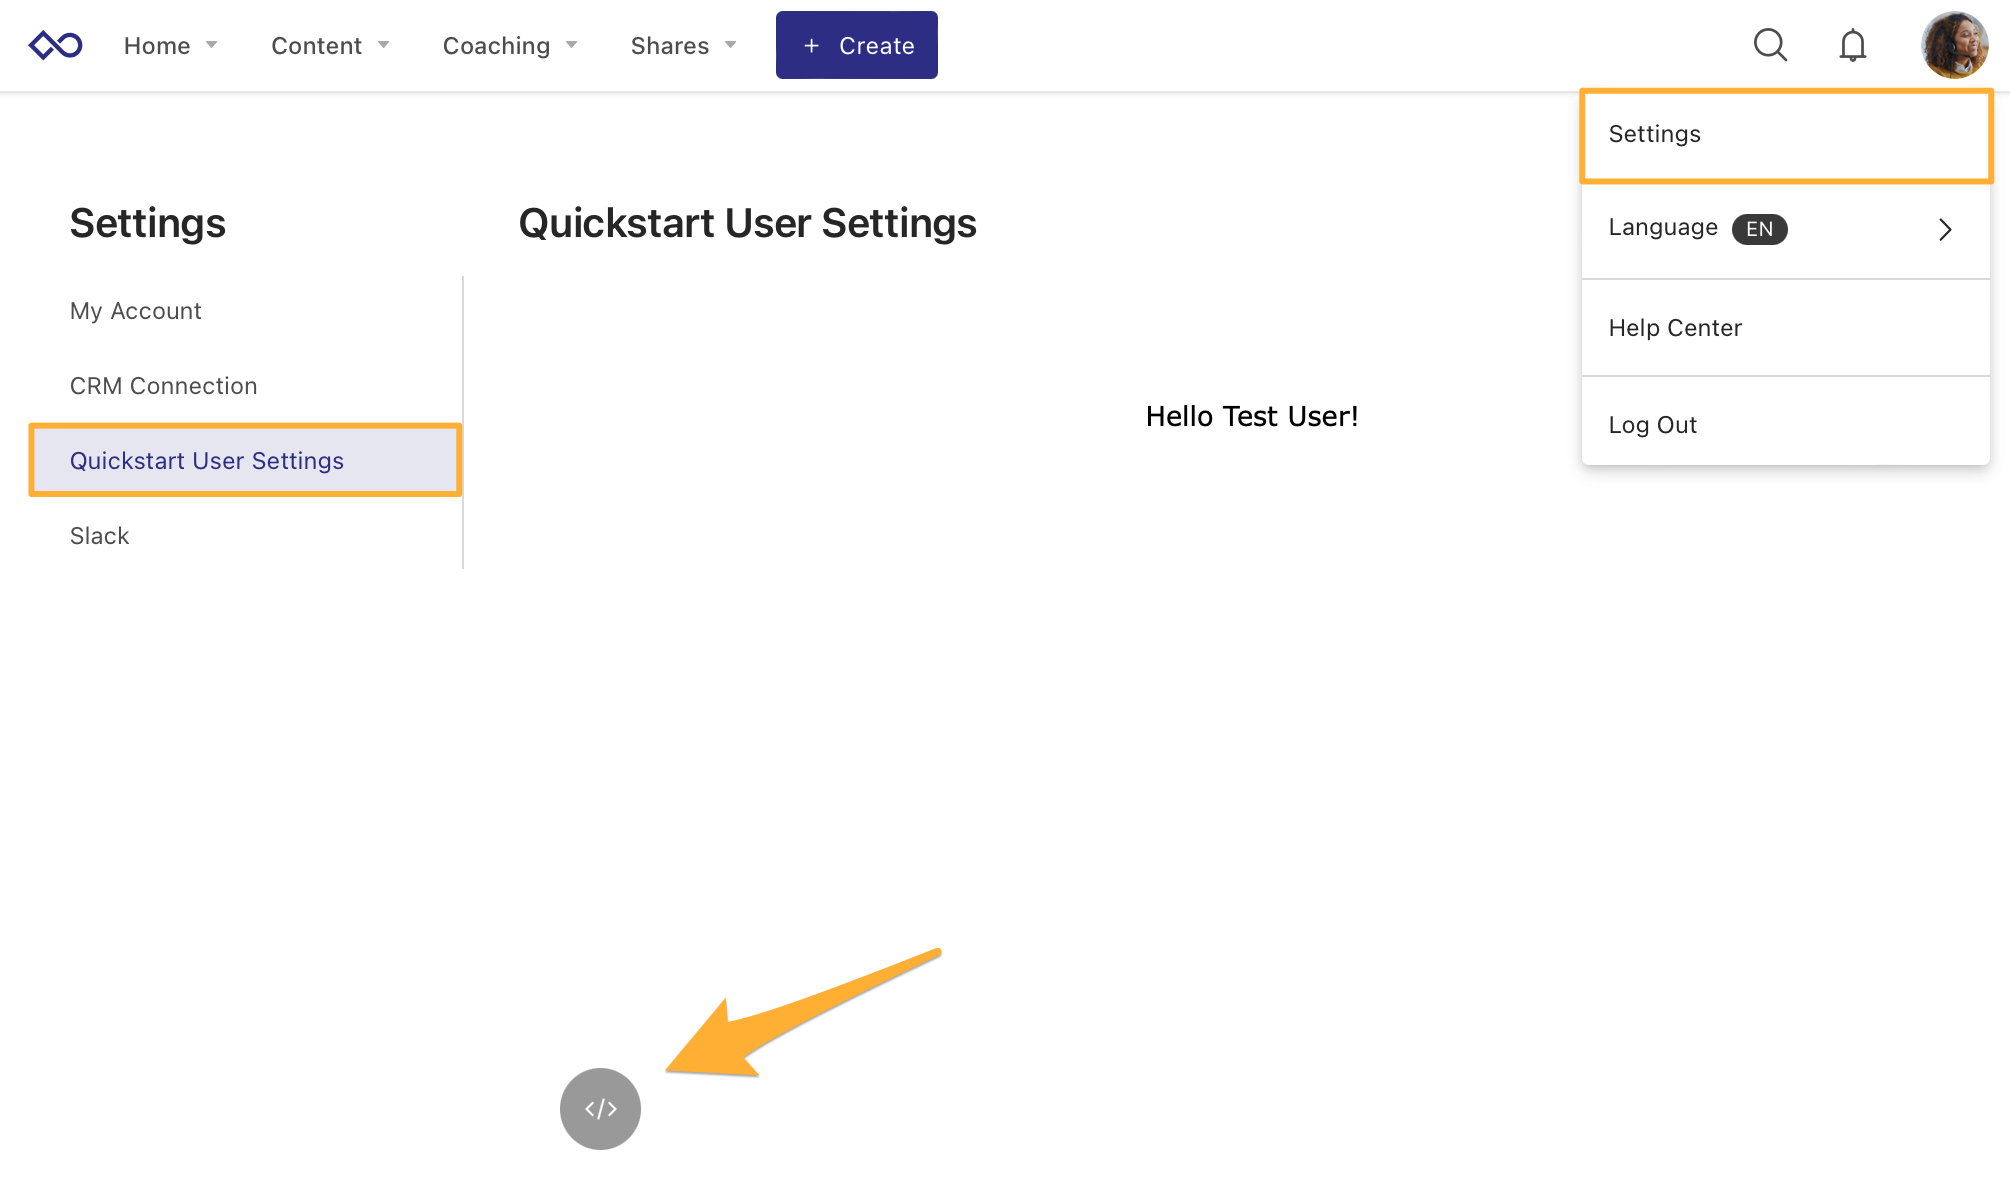
-
Input the URL of your local server to render it within the Showpad platform:
Experience Type Extension
In your app's root folder, run the following command:
npm run dev experience
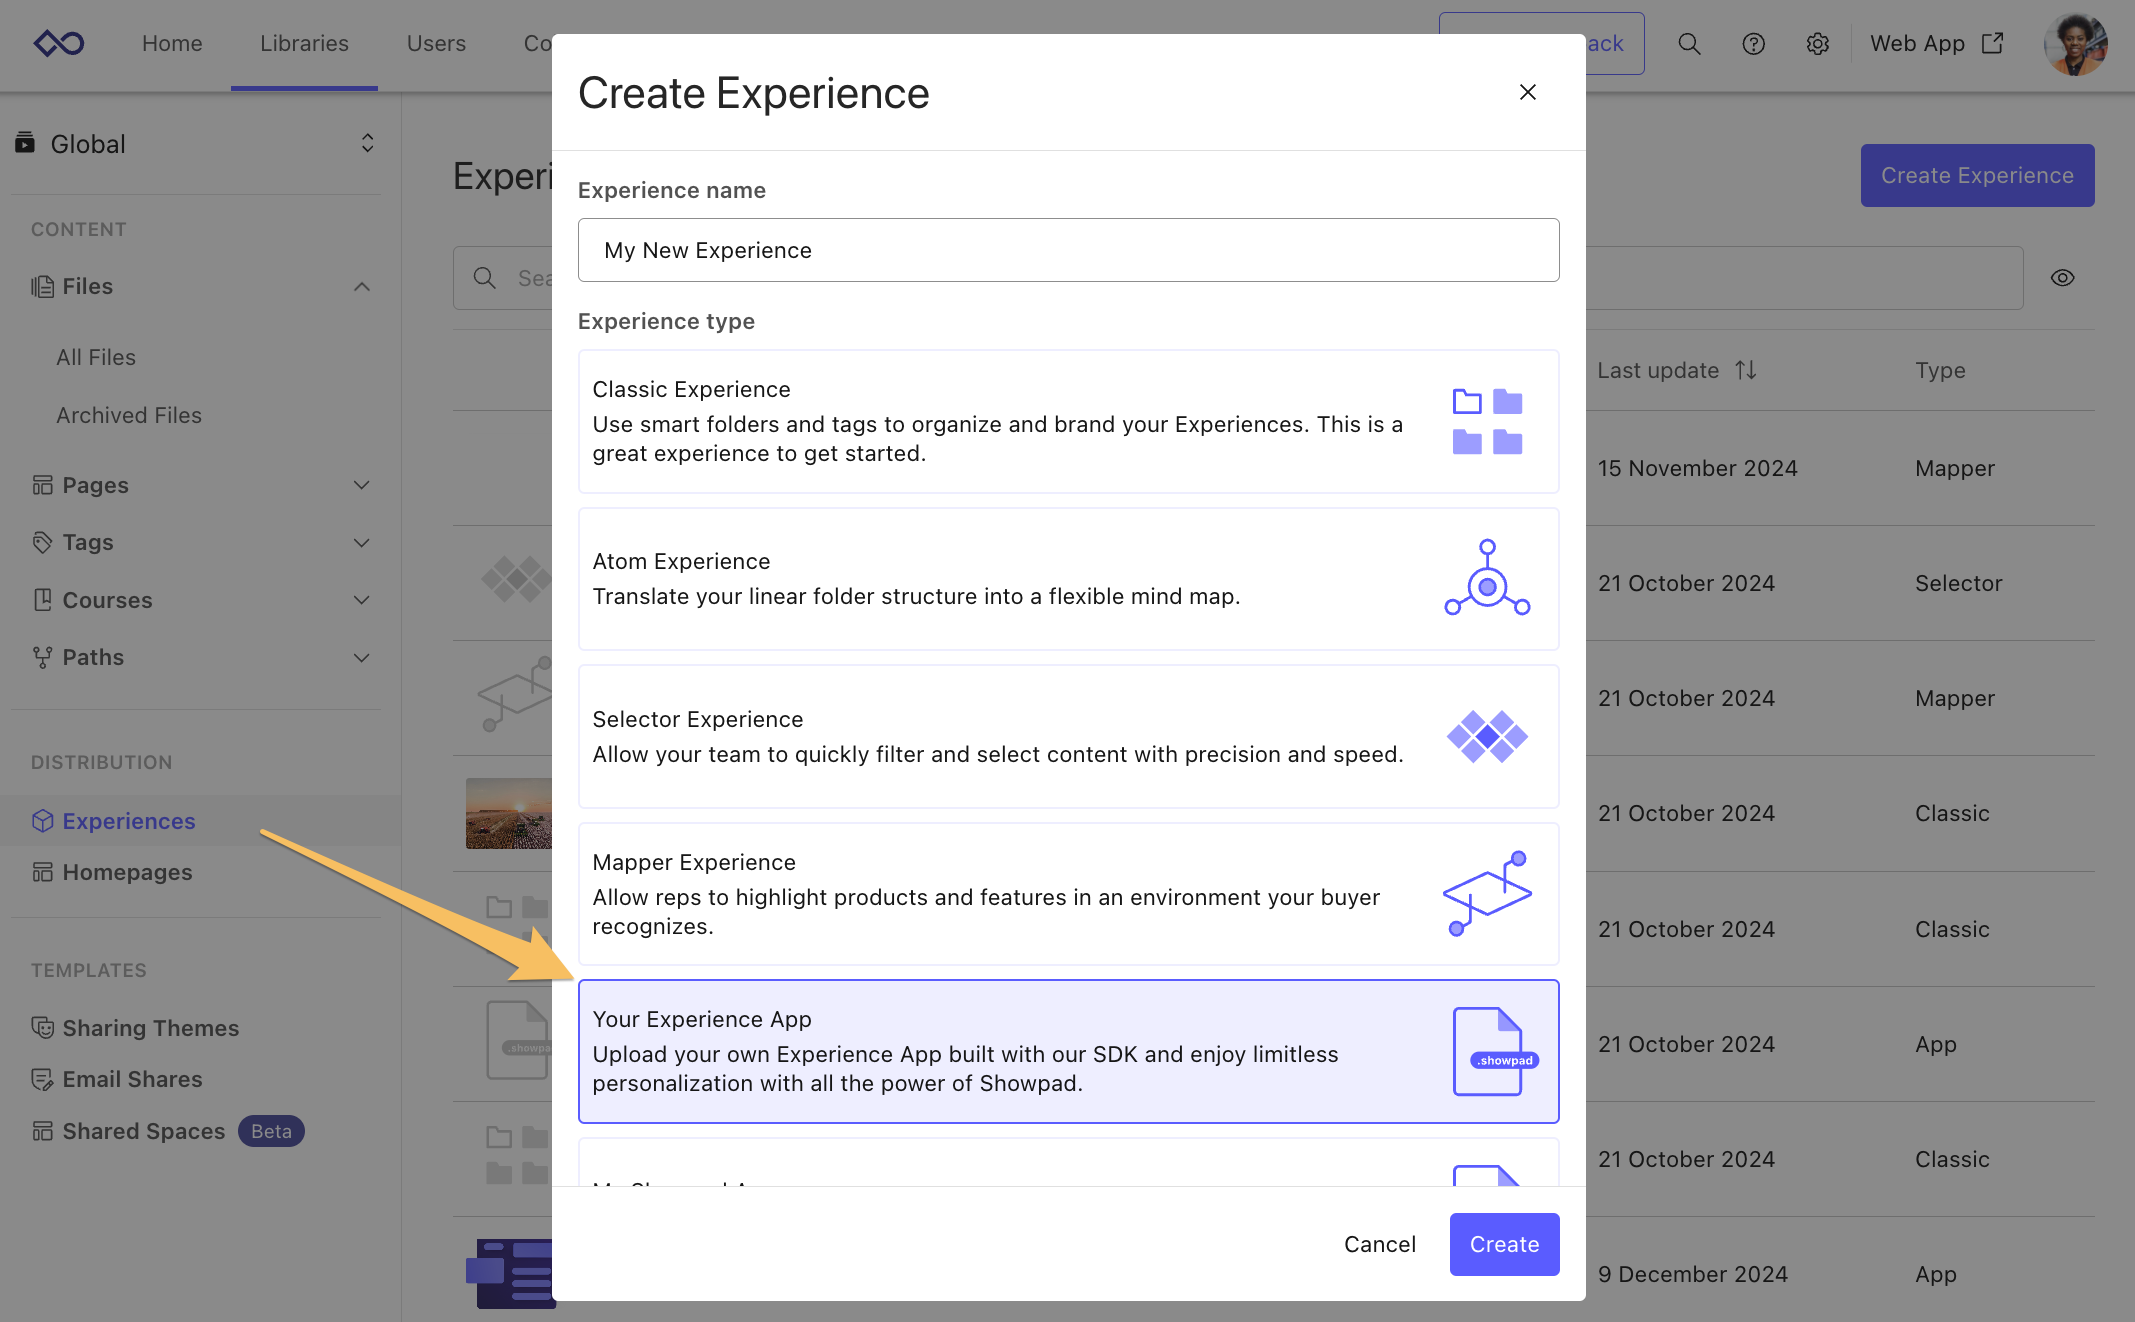
You’ll then need to create an Experience from the Experience Type as described here: Install custom Showpad Apps
Once your Experience is published, you can:
-
Navigate to Experiences on the Web App
-
Select the Experience you’ve just created
-
Click the
</>button:
-
Input the URL of your local server to render it within the Showpad platform: